Hands-down, the BEST way to Install MySQL on Mac OSX Mavericks

I recently had some database woes. I needed to restore a MySQL database of a clients existing website that was dozens of gigabytes in size. I had a great deal of trouble trying to import that data, but that’s a story for another time. This was about getting MySQL installed in the first place (for a development environment).

At first, I tried using Homebrew – because its awesome and I like it. But sadly, for one reason or another the default configuration just wasn’t working for me. It was simple and blind, but too well hidden and I didn’t feel like there was enough “control” (like getting setting/getting the default root password for example). If you’re going to automate something, then automate it – but don’t ask me to run stuff to secure my install when your supposed to be automating it for me.  Bah humbug!

However, the wonderful folks at macminivault.com solved all my problems. It was simply perfection. Exactly the right balance of automation and control.

Just open up Terminal and paste this into it:

bash <(curl -Ls http://git.io/eUx7rg)

It will tell you or prompt you for the rest. And don’t forget to get the text file containing the root password, before you mistakenly delete it.

Simplicity itself.

(comic property of http://www.brainstuck.com/)

How to Fix ‘Requirements installation failed’ When Installing RVM Ruby on OSX Mavericks

Installing Ruby with RVM on Mac is a cinch, simply execute:

\curl -sSL https://get.rvm.io | bash -s stable --ruby

But recently, while trying to install RVM instead of the default Mavericks Ruby, the script that normally just “works” fails with the ominous message:

: Requirements installation failed with status: 1.

It turns out to be something funky with Mavericks and the Homebrew step of the installation. Luckily, despite the failure of the script, you can simply install Hombrew manually to solve the problem. Installing Homebrew is a triviality, simply execute the following command in Terminal:

ruby -e "$(curl -fsSL https://raw.github.com/Homebrew/homebrew/go/install)"

It will first install the XCode Command Line Tools (don’t worry if you already have it, just hit “install” and let it do it’s thing) and then once the Xcode dialog disappears, hit [any] key in Terminal and it will auto-download and auto-install itself. Once its all finished (and it can take a few minutes, just be patient), simply re-execute the command to install RVM Ruby.

Showing Hidden Files in OSX Finder

Just like when using Windows, sometimes it is necessary to make special hidden system files visible to Finder.  There is no preference for it, but with a simple Terminal command, things can be made visible very easily, on a privileged user account.

Simply open the ‘Terminal’ application, and at the prompt, type:

defaults write com.apple.finder AppleShowAllFiles TRUE

and then:

killall Finder

This will cause all Finder windows to close and then reopen with the hidden files, visible and identifiable with a ghost-like appearance. You should be able to interact with them normally now.

Screen Shot 2013-11-28 at 11.00.54 pm

Syncing Google Contacts with iMessage (and Contacts) on OSX Mavericks

You may remember earlier in the year I took issue with the super secret hidden checkbox in the Mountain Lion’s version of Contacts which magically syncs your Google contacts with OSX Contacts and Messages. As it seems, Apple have finally fixed the SSL problem stopping you from syncing through the Google option in System Preference’s Internet Accounts setup.

Getting the sync to work now is as trivial as adding a Google account to your Internet Accounts list, log in and turn on the items you want to sync. Screen Shot 2013-11-26 at 9.46.42 pmHurray! Easy peasy.

It’s beyond me that it wasn’t like this before.


Pipe Viewer (pv) in Mac OSX


Update:
Forget what I said.  Install Homebrew (really, do it now) and use HomeBrew to install it.


Pipe Viewer (pv) – is a terminal-based tool for monitoring the progress of data through a pipeline. It can be inserted into any normal pipeline between two processes to give a visual indication of how quickly data is passing through, how long it has taken, how near to completion it is, and an estimate of how long it will be until completion. However, it isn’t included by default in Mac OSX.

The good news is that there are several ports of pv, you just need to go and grab one:

  • HomeBrew: Run “brew install pv” to get the latest version.
  • MacPorts: Run “port install pv” to get the latest version.
  • Or (recommended) install the Rudix pv port (a simple package installer)

Pv allows you to get a really awesome progress of your terminal commands to see how things are going; especially useful for long operations (such as cp or tar etc) so you know everything is ticking over time (and perhaps even giving an ETA for completion):

13.2GiB 1:33:17 [3.57MiB/s] [================================>                ] 67% ETA 0:44:4

I highly recommend this for anyone doing long, large or complicated terminal commands.  It’s outstanding! To learn more about using Pipe Viewer, this is a great resource.


Syncing Google Contacts with iMessage (and Contacts) on OSX Mountain Lion

Being able to sync your Google Contacts with your OSX Contacts is possible – it just takes a bit of digging.

As a long-time iPhone 4 user, I was recently introduced to the wonderful OSX Messages app, which lets me read/send iMessages from my Mac, as if I had sent a text from my phone. Such an amazing thing (even if it does only work with other iPhone users). However, it only used phone numbers to identify contacts; less than ideal since I seldom reference my friends and family by their cell numbers.

I use Gmail for all my email purposes; and after loosing my completely contacts list TWICE from the failures of Windows Mobile 6, I am also a huge advocate for Google Contacts – awesome synergy between my phone list and email contacts. and while I’ve been very happy Syncing my email/calendar/contacts between Google and my iPhone; my Mac just didn’t want to come to the party and I refused to retype my contacts manually.

At first I tried syncing the contacts over Google’s Microsoft Exchange Protocol (which is actually the best way of syncing Gmail/contacts/etc onto the iPhone), however you cannot get the necessary SSL to connect to Google on Mountain Lion. Next I tried backing up my iPhone contacts into iCloud, which also failed.

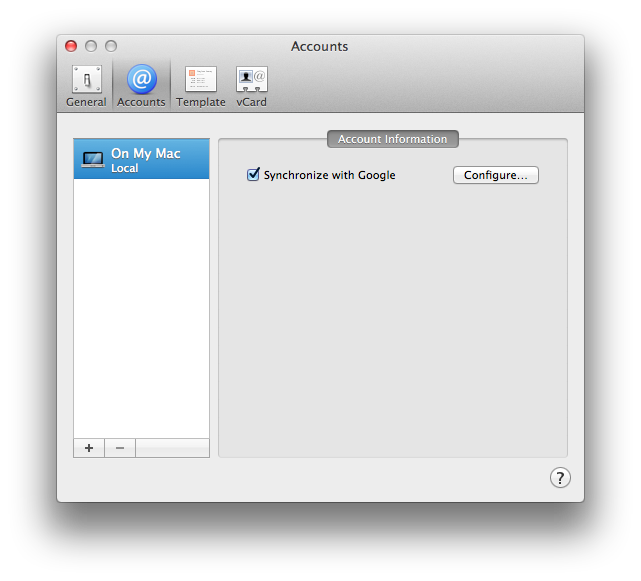
I was about to give up until I discovered that the preferences for the Contacts app has an option that I didn’t know about. Carefully disguised under the “On My Mac” account, you will find the option to sync with Google.

syncing-google-contacts-in-mountain-lionHurray! Easy Peasy.

‘belongs_to’ and ‘has_one’ Differentiated

One of the more common confusions with ActiveRecord associations is the difference between the `has_one` and `belongs_to` relationships.

However, they are not interchangeable, and there are some serious differences. A `belongs_to` can only go in the class that holds the foreign key whereas `has_one` means that there is a foreign key in another table that references this class. So `has_one` can only go in a class that is referenced by a column in another table.

So this is wrong:

class Transaction < ActiveRecord::Base
  # The transactions table has a order_id  
  has_one :order                
end

class Order < ActiveRecord::Base
  # The orders table has a transaction_id
  has_one :transaction          
end

So is this:

class Transaction < ActiveRecord::Base
  # The transactions table has a order_id
  belongs_to :order             
end

class Order < ActiveRecord::Base
  # The orders table has a transaction_id
  belongs_to :transaction     
end

For a two-way association, you need one of each, and they have to go in the right class. Even for a one-way association, it matters which one you use, and which direction you use it:

class Transaction < ActiveRecord::Base
  # This table has no foreign keys
  has_one :order             
end

class Order < ActiveRecord::Base
  # The orders table has a transaction_id
  belongs_to :transaction     
end

How to Create a Bootable Lion Restore USB Drive without Snow Leopard

If you are like me and have installed Mac OSX Lion on a computer and need or want to create a bootable OSX Lion USB Drive, Apple have released an official tool to accommodate you.

Its pretty basic, download the tool, run the file inside the .dmg file and follow the prompts. You will need a 8Gb USB thumb drive (I believe 4GB won’t quite be enough). Now you can simply plug the thumb drive in, and on boot hold down the [option] key and select the recovery drive from the menu. I can verify that you can use this installer to create clean installs of lion without having to first install Snow Leopard and on machines other than the one that created the recovery drive.

System-wide Git Global Ignores

If you are like me and love using a Mac for your development tasks, and want a way to get Git to ignore any file (like those pesky .ds_store’s) forever and for EVERY repository there is a very simple way to it.

Open Terminal and type:

git config --global core.excludesfile ~/.gitignore

and then:

echo .DS_Store >> ~/.gitignore

This will work for anything you want, just modify the second command as appropriate.  And you can run the second command as many times as you need.

Ruby Script to Import Google Contact Photos From Gravatar

Google Contact photos are a much neglected feature of the Google Stack. It really adds to the user experience when you see each of your contact photos when you make or receive a call. However, it can be a real pain (especially if you have hundreds of contacts).

But I had an idea recently, to try and match my Google Contact emails with Gravatar and try to auto-populate some of the dozens of contacts that didn’t already have a photo (after all a Gravatar is better than nothing).

So I wrote a Ruby script to find my contacts missing a photo and try to update it with a Gravatar (wherever possible). NB: You may need to first install the GData (Google Data) gem by opening a Terminal window and issuing: sudo gem install gdata.

#!/usr/bin/env ruby

# Google Contact Photos - Gravatar Importer
# Written by Ashley Angell
# http://ashleyangell.com
# Licenced under Creative Commons with Attribution

require "rubygems"
require "gdata"
require "rexml/document"
require "digest/md5"
require "net/http"
include REXML

none = 'd5fe5cbcc31cff5f8ac010db72eb000c'
user = ARGV[0]
pass = ARGV[1]

client = GData::Client::Contacts.new
client.clientlogin(user, pass)
data = client.get("https://www.google.com/m8/feeds/contacts/#{user}/full?max-results=10000")
myxml = Document.new data.body
p "contacts"
puts "-"*70
i = 0
myxml.each_element("feed/entry") do |e|
  begin
    gd = e.elements['gd:email']
    if !gd.nil?
      email = gd.attributes['address'].downcase
      hash = Digest::MD5.hexdigest(email)
      image_src = "http://www.gravatar.com/avatar/#{hash}"
      nil_image = false
      image_element = e.get_elements("link[@rel='http://schemas.google.com/contacts/2008/rel#photo']")[0]
      if !image_element.nil? and image_element.attributes['gd:etag'].nil?
        data = nil
        md5 = nil
        Net::HTTP.start(URI.parse(image_src).host) do |http|
          resp = http.get(URI.parse(image_src).path)
          data = resp.body
          md5 = Digest::MD5.hexdigest(data)
          File.open("#{email}.png", 'w') do |f|
            f.puts data if md5 != none
          end
        end
        md5 = Digest::MD5.hexdigest(data)
        if md5 != none
          puts "#{email} > #{image_src}"
          client.put_file(image_element.attributes['href'], "#{email}.png", 'image/png')
          i = i + 1
        else
          puts "#{email} > no match"
        end
      else
        puts "#{email} > skipped (already has photo)"
      end
      File.delete("#{email}.png") if File.exists?("#{email}.png")
    end
  rescue Exception => ex
    puts ex
  end
end
puts "Updated #{i} contact photos"

To execute it, simply copy and paste this into a text editor (or download it and unzip) and from Terminal (command) window and execute the following commands:

sudo chmod +x googlegravatarimporter.rb [Enter]
./googlegravatarer.rb your.address@gmail.com your_password [Enter]

It will cycle through your Google Contacts and indicate what action was taken. For me, surprisingly updated a few dozen contacts (even more than I expected).

I’ve posted this here for others that might want to do the same thing but cannot be bothered writing the script for it. Consider it posted here under Creative Commons with Attribution.